Beginners Guide to Badge Hacking

Posted on 2016-08-05 in emf

We're going to create an LED torch for seeing our way around the camp.

Soldering the LED

You should have received an LED and a resistor with your badge. First, grab the resistor. Bend the legs over so they fit in the holes in the board, using the resistor lead bender.

Leg Bender

It doesn't matter way round the resistor goes.

Resistor Fitted

Flip over your board and solder the resistor in place, then trim down the legs to be flush against the board.

Next, the LED. It does matter which way round the LED goes - look for a flat side on the LED and match it up with the flat side on the board. Pull your LED out about a centimetre and bend it over a bit.

LED Fitted

Flip the board over and solder the LED into place.

Testing

Plug your badge into your laptop, and use the information on https://micropython.org/doc/tut-repl to connect to the usb-serial port. If you hit Ctrl-C, you drop out of the badge software, and get a REPL prompt. You can tell this is working because you'll see three > symbols.

Type the following at the prompt. This should turn your LED on!

1
2
3
>>> import pyb
>>> pin = pyb.Pin("LED_TORCH")
>>> pin.high()

Of course, thats a bit of a pain to do every time we want the LED on, so let's make an app!

The App

Your badge should have shown up as a USB drive. Open the folder apps, and create a folder within it called torch.

Create a file within this called main.py. This is your app's main file. Open it in a text editor.

First, we need to tell the badge some details about your app. This is done in a header section at the top of the file

1
2
3
4
5
6
### Author: Your Name
### Description: Torch
### Category: Flashy
### License: MIT
### Appname : Torch
### Built-in: no

You could save and run your app now, but it won't actually do anything yet. Lets add the code:

 1
 2
 3
 4
 5
 6
 7
 8
 9
10
11
12
### Author: Your Name
### Description: Torch
### Category: Flashy
### License: MIT
### Appname : Torch
### Built-in: no

import pyb
pin = pyb.Pin("LED_TORCH")
pin.high()
while True:
  pass

Save, and run your app. When you run it the LED should turn on, brill!

Of course, we're not showing anything on the screen. Lets have a nice dialog box to show we're in the torch instead of that while loop.

 1
 2
 3
 4
 5
 6
 7
 8
 9
10
11
12
13
### Author: Your Name
### Description: Torch
### Category: Flashy
### License: MIT
### Appname : Torch
### Built-in: no

import ugfx, pyb, dialogs
pin = pyb.Pin("LED_TORCH")
pin.high()
ugfx.init()
ugfx.clear(ugfx.html_color(0x7c1143))
dialogs.notice("Shine a light!", title="Torch", close_text="Exit")

Run your app again and you should have a nice button you can press to shine a light in the camp!

You can unplug the badge from your computer when the LED has finished flashing, but we recommend you eject the drive first.


TiLDA for Wearable Electronics

Posted on 2016-08-03 in emf

Did you know that as well as being an awesome internet-connected, python-powered portal to nirvana (OK, one of those may be a lie), your badge is also a rad wearables controller?

At badge HQ, we love flashy LEDs, and we love sewing them to ourselves for no apparent reason. That's why each badge has support for attaching and driving a string of Neopixel / WS2812 LEDs up to X LEDs long.

If you already have some neopixels, you'll need to add a three-pin connector to the end of the string for connecting to the badge. The pinout is a servo-style pinout, with the +v in the center, which makes it more difficult to explode things if you plug it in backwards!

Neopixel Header

I would suggest using a right-angled connector, and having your wire go off the side of the badge. That way it isn't sticking out or stabbing you in the chest.

NOTICE: Unfortunately, the badges we've made for the event have the onboard neopixel fitted backwards (oops!), so unless you want to have a go at rotating it (we can help with that at the Badge Tent), you cant use the onboard header. Luckily, CH2 on the Servos connector block is also able to be used for neopixels, so you can solder the connector there instead.

The central V+ pin is at battery voltage when running from battery, so varies between 4.2 and 3.6 volts depending on how flat your battery is. We've tested this with a string of 5V neopixels, and it is enough to power them up fine. However, if you are worried about your battery running out too fast, or want to drive more neopixels than the badge can handle, you can plug a USB battery pack into the badge, and the LED strip will be provided with a full 5V.

The App

OK, so thats the hardware, now for the software. Step one is to load up the Wearables from the App Library. As soon as you reboot, the neopixel on your badge (or the first on your strip) should start cycling through the colour wheel.

What we need to do is tell the app what sequence to run, and how many LEDs you have connected to your badge. Lets try the rainbow:

Rainbow

Number of LEDs

Speed

Pretty Rainbow

Rad.

Note that once you've set up the number of LEDs connected, you can just press B to skip that screen in the future, it'll keep the setting.

Matrix next. This doesnt need anything extra configuring, and shows a green flickery pattern like on the film (which i'm informed is now 17 years old, what?!):

There is no spoon

And lastly, Colour displays a single colour so you can make everything pink! You need to enter a HTML colour code, this is ff00ff:

HTML Colour Code

Pink!

If you want to add any extra sequences, code for the wearables app is available at https://github.com/thinkl33t/TiLDA-Wearables . Just dump it on your badge at apps/wearables/ I'll accept pull requests if you add any extra sequences, so get making!


Automatically starting a Python script at boot on Raspbian Jessie

Posted on 2016-07-06 in sysadmin

As part of the Hackspace Manchester door control system, we have a raspberry pi running a little script that checks scanned cards against a database of members and opens the door if the card is known.  This has been humming along happily for around 3 years now, until recently it stopped updating card IDs when they were changed via the webui.

This led to a bit of a bug hunt, concluding with the fact the version of openssl on raspbian wheezy was waaaaay out of date, and we'd recently updated our members system to disable insecure cyphers on the HTTPS protocol.  We fixed it by upgrading to jessie, which as a side effect completely killed the auto-start of the door opening programme. Yay?

So.  Jessie.  Systemd.  Init system is a a bit different from sysvinit, but on the whole i find it a lot more sensible.  We want to run a script as the user 'alfred' (the door entry service user).  We also want to wait until the system is booted, and the serial port is available.

My script is called alfred, so i create the following file in /lib/systemd/system/alfred.service

 1
 2
 3
 4
 5
 6
 7
 8
 9
10
11
12
[Unit]
Description=alfred
After=dev-ttyAMA0.device multi-user.target

[Service]
Type=idle
ExecStart=/home/alfred/FRED/fred/fred.py
WorkingDirectory=/home/alfred/FRED/fred/
User=alfred

[Install]
WantedBy=multi-user.target

The After= says what services need to be up before this is run. In this case, it wants ttyAMA0 to be available, along with multi-user (this is the point where you could normally log in)

ExecStart= specifies the script I will be running, WorkingDirectory= is the directory to run the thing from (as i use relative paths in my python script, i need to set this), and User= says what unprivileged user to run the script as, since you don't want to be running random things as root if at all possible!

WantedBy= says that this should be started at the same time as multi-user.target, so at the end of the boot process, at the point you could normally log in.

We can then set up our new service to start on boot, and run it for the first time:

 1
 2
 3
 4
 5
 6
 7
 8
 9
10
11
12
13
$ systemctl enable alfred
$ systemctl start alfred
No errors, so lets check the status:
$ sudo systemctl status alfred
● alfred.service - alfred
Loaded: loaded (/lib/systemd/system/alfred.service; enabled)
Active: active (running) since Wed 2016-07-06 16:42:59 BST; 30min ago
Main PID: 709 (fred.py)
CGroup: /system.slice/alfred.service
└─709 /usr/bin/python /home/alfred/FRED/fred/fred.py
Jul 06 16:42:59 alvin systemd[1]: Starting alfred...
Jul 06 16:42:59 alvin systemd[1]: Started alfred.
Jul 06 16:43:01 alvin fred.py[709]: 2016-07-06 16:43:01,577 FRED 0.7

Looks good, service is started, and we're getting some log output from it. Reboot to check everything comes up correctly and you're done!

... Though i wasnt. One gotcha I ran into is that because of the way raspbian's networking is set up, you can't get systemd to wait until after you have a network connection configured before starting the script (it will wait until the networking service is started, but not wait for the network to actually be up). This can be worked around pretty easily by setting the "Wait for network on boot" option in raspi-config, which will pause the whole boot process until it gets a DHCP lease.


Anatomy of a Scam: the tale of the £40 3D printer.

Posted on 2015-10-05 in misc

Aliexpress Screenshot

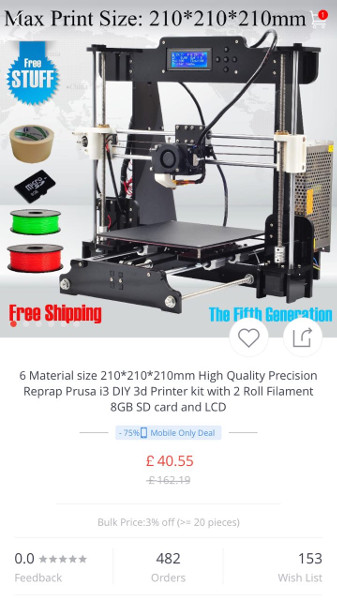
When i saw this, I thought "£40 for a 3d printer?  Including UPS shipping? This is too good to be true!"

Though thinking about it a bit more, I couldn't think of any way they could get away with the money.  Aliexpress offers full buyer protection if you buy through alipay, and money is held in escrow.  So I bought a couple to see what the dealio is. If it does arrive and its shit, just the motors would cost more then £40 to buy, and I can definitely reuse them.  I figured going into this paranoid, I might just about be able to figure it out before they run away with my money.

This morning, I got shipping confirmation, with a china post shipping code. "Wow, maybe its not a scam?" I thought. Then I received this message:

hi. friend. Because you choose courier suspended. We send you the goods by China Post Air Parcel. Give you cause delays receive the package, so we give you $15 in compensation. You may submit disputes. A partial refund of $15 agreement. We give you a refund in a timely manner. Thank you

Ok, yeah, thats a bit odd.  This is the penny dropping.

The way AliExpress works, you can open a dispute on any order for either the full, or part of the purchase price.  If the seller agrees, the refund is paid out to you right away.  But if I open a dispute for the shipping, maybe I lose the ability to open a dispute for the remainder if the item doesn't arrive? The FAQs were unclear, so I set off to AliExpress customer support:

If I open a dispute for a partial refund (for the shipping), can I then open another dispute later if the item does not arrive

No, if the dispute has been agreed the seller with partial refund, the remaining payment will be release to the seller automatically

With this, I highly suggest to please ask a full refund instead.

So there it is.  Beautiful in its simplicity.  You ask for a dispute for the shipping charges, get your £8 shipping back, and lose the ability to claim back your £32 for the rest the item when it doesnt arrive.  Since I have 40 days of purchase protection remaining, I'm going to hold off claiming a full refund for a couple of weeks, and I'll update here if I turn out to be wrong and something does arrive!

Update!

Another message is being sent to those of us who have ignored the first message, or replied that the refund is not necessary:

Friends. Goods are in transit. Do not worry. We give you a refund of compensation today. Tomorrow no longer compensate, please submit the dispute in a timely manner, thank you

Ahh, a time limit! Best get the refund quick, otherwise they wont offer it anymore! I've received this second message, as have others. I'm guessing it wont be long until aliexpress close their account, so they've gotta try and get as much cash out asap.

Update!

Just got an email from aliexpress:

Your order --REDACTED-- has been frozen due to suspicious seller activity.

We have suspended this seller’s account because we detected unsafe trading activities. All of your pending orders with this seller have been frozen for your security.

We have asked this supplier to provide supporting evidence, such as shipping documents and qualification certificates. If the supplier is unable to provide the evidence or if the evidence is insufficient, we will close the order and process the refund for you within 5 business days (In case of certain circumstance, the processing period may be extended).

We apologize for this inconvenience. At AliExpress we are committed to ensuring you enjoy a safe shopping experience. We will continue striving to improve. Your understanding and cooperation are highly appreciated, if you have any question or suggestion, please click here

Your understanding and cooperation are highly appreciated.

Sincerely,

AliExpress Trade Security Department

I'm fairly unsurprised by this, hopefully the refund will be forthcoming fairly quickly.

Final Update

Your Order No:-REDACTED- has been closed because the supplier did not provide necessary evidence. The payment will be refunded to you within 7-10 working days.

AliExpress strives to continuously improve our trading environment. Thank you for your understanding and continued support.

Sincerely,

AliExpress Trade  Security Department

And its over. This experience has massively reaffirmed my confidence in aliexpress' customer services and payment systems. Other sales websites should take notice!


Setting up a self-healing SSH tunnel for Raspberry Pi using Debian.

Posted on 2015-04-30 in sysadmin

I use quite a few raspberry pi's in locations that dont have the ability for me do incoming SSH to update / reboot / maintain them.  This is how i set up a reverse SSH tunnel to them, allowing me to access them from anywhere with internet access!

If the site has a proxy, first you'll need to install a proxy puncher to allow you to bypass it.

1
$ sudo http_proxy="http://proxy.ip.address:port" apt-get install corkscrew

Then install screen. Screen allows you to start a process running 'detached' from your current shell, so you dont have to be logged in to keep the tunnel up.

1
$ sudo apt-get install screen

Create a user for your ssh tunnel. You could just use the default pi user, but i prefer to use a dedicated tunnel user.

1
$ sudo adduser --system tunnel

Create tunnel config

1
2
$ sudo -u tunnel mkdir /home/tunnel/.ssh
$ sudo -u tunnel vim /home/tunnel/.ssh/config

Paste the following into the file. This forwards port 22 (ssh) and 80 (http) on the raspberry pi to ports 8022 and 8080 on your VPS.

1
2
3
4
5
6
7
8
9
ProxyCommand corkscrew 127.0.0.1 3128 %h %p
Host tunnel
  Hostname your.vps.hostname
  Remoteforward 8022 localhost:22
  Remoteforward 8080 localhost:80
  Port 443
  User tunnel
  ServerAliveInterval 10
  ServerAliveCountMax 3

NOTE: If you are not using a proxy, remove the corkscrew line and the port 443 line. The port 443 line above is only needed if you are behind a proxy and firewall that disallows port 22 outgoing. I have set up my SSH daemon on the VPS to listen to port 443 (the https port) as well as the normal 22 as this will manage to punch its way through most proxies.

The ServerAliveInterval and ServerAliveMax variables above basically say "send a packet across the tunnel every 10 seconds. If you don't get anything back after 3 tries, close the tunnel"

The above config also assumes you have set up a tunnel user on the machine you are SSHing to. If not, either create a tunnel user the same way we did above, or change the user line in the config to the username you will be using on the VPS side.

Generate your RSA key and upload to the VPS

1
2
3
4
$ sudo -su tunnel
$ export HOME=/home/tunnel
$ ssh-keygen
$ ssh-copy-id tunnel

At this point, you should be able to SSH to tunnel without typing in any passwords etc.

1
2
$ ssh tunnel
Linux thinkl33t 3.2.0-4-686-pae \#1 SMP Debian 3.2.65-1+deb7u2 i686

Set up our shell scripts to automatically start the tunnel.

 1
 2
 3
 4
 5
 6
 7
 8
 9
10
11
$ sudo -su tunnel
$ mkdir /home/tunnel/bin
$ echo 'PATH="\$HOME/bin:\$PATH"' | tee /home/tunnel/.bashrc
$ echo '\#!/bin/bash' | tee /home/tunnel/bin/monitor\_tunnel.sh
$ echo 'APPCHK=\$(screen -ls | grep -c tunnel)' | tee -a /home/tunnel/bin/monitor\_tunnel.sh
$ echo 'if \[ \$APPCHK = "1" \]; then' | tee -a /home/tunnel/bin/monitor\_tunnel.sh
$ echo ' echo "Starting SSH tunnel"' | tee -a /home/tunnel/bin/monitor\_tunnel.sh
$ echo ' screen -mdS tunnel ssh -N tunnel' | tee -a /home/tunnel/bin/monitor\_tunnel.sh
$ echo 'fi' | tee -a /home/tunnel/bin/monitor\_tunnel.sh
$ echo 'exit' | tee -a /home/tunnel/bin/monitor\_tunnel.sh
$ chmod a+x /home/tunnel/bin/monitor\_tunnel.sh

The above script checks for an already open screen session with the name 'tunnel'. If it doesn't exist, it creates it. If it does exist it just ends. The screen session is launched in a detached state (in the background), and will automatically end when the SSH tunnel falls over.

Set up the crontab to automatically run our monitoring script once a minute

1
$ echo '\*/1 \* \* \* \* /home/tunnel/bin/monitor\_tunnel.sh' | crontab

Your tunnel should come up shortly, woo!

To test it out, from your VPS, type

1
2
3
$ ssh localhost -p 8022
parag0n@localhost's password:
Linux thinkl33t 3.2.0-4-686-pae \#1 SMP Debian 3.2.65-1+deb7u2 i686

Brill, you can now SSH in from your VPS... But by default SSH tunnel ports are only available from localhost, so you'd have to log into your VPS every time you wanted to get into the pi. So, lets edit the SSH config file on your local machine!

1
2
3
4
Host pi
  Hostname localhost
  Port 8022
  ProxyCommand ssh your.vps.hostname nc %h %p

This will allow you to type in ssh pi on your local machine, and will automatically ssh into your VPS, then SSH into localhost. Sorted.